This is how the final app is going to look like.
So, lets get started.
1. Open Xcode. Create a new project.
2. Select iOS application, Tab Bar Application.
3. Name it MyTabBar.
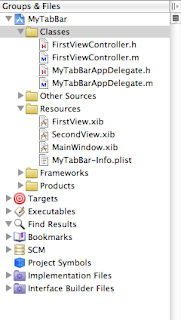
4.Note that under the classes folder, you have these files automatically created for you.
5. Double click on MainWindow.xib to look at it in Interface Builder.
6. Click the first tab of the Tab Bar Controller.
7. Go to the identity inspector. (after selecting the first tab,press command 1)Notice that the value of the class field is FirstViewController. This means that it is connected to the FirstViewController in our project file.
8. Also notice that there is no SecondViewController in our project file, and that the second tab is not connected to any class in its identity inspector. We will have to create a new one ourselves later.
9. But for now, let us create the UI for our FirstViewController. Go back to XCode and double click FirstView.xib to open in interface builder.
10. Edit it. Add a label, an image view and a text view. Arrange them like so. The label’s text is “Air Jordan 3”. Click the file’s owner icon. At the identity inspector (command 4), make sure that the class is set to FirstViewController.
Also, to make the text view scrollable, make sure that in the attributes inspector (just press command 1 to bring up the attributes inspector) , the editable check box is unchecked. Also check the scrolling enabled. Also, most importantly, scroll way down and check the user interaction enabled. (this took me quite a while to figure out).
11. Save it. Go back to XCode.
12. Edit FirstViewController.h
13.Edit FirstViewController.m
Add this line after the @implementation FirstViewController:
@synthesize aj3ImageView, aj3History;
Add these lines in the - (void)dealloc method: (just memory management stuff)
[aj3History release];
[aj3ImageView release];
15. Right click SecondView.xib under the resources folder and delete it. Make sure to select “also move to trash”. We are not going to need it since we will now be using the “SecondViewController.xib” that came with the new file we just created. (although we could use it, I find that using the new xib that came with our new file easier).
16. Now open MainWindow.xib. Select View Controller (second) under Tab Bar Controller. Go to Identity Inspector (command 4), under class, select the drop down text field, then select SecondViewController. This will now connect the SecondViewController class and xib to the tab bar controller. Then go to the attributes inspector (command 1), then for NIB name select SecondViewController. Save it.
17. Now, edit SecondViewController.h:
18. Edit SecondViewController.m
Add this line after the @implementation SecondViewController:
@synthesize aj5ImageView, aj5History;
Again, add these lines in the - (void)dealloc method:
[aj5History release];
[aj5ImageView release];
19. Press command B to build the project, so we can connect our outlets in Interface Builder.
20. Open SecondViewController.xib. Add a label, a text view, and an image view just like the FirstView.xib. Dont worry if it does not have the black tab bar at the bottom. It will show on the final build. Click the file’s owner, under the identity inspector, make sure the class is SecondViewController. This is just similar to what we did in the FirstView.xib.
21. Now control-click drag from the file’s owner to the image view and select aj5ImageView. Likewise, control-click drag from file’s owner to the text view and select aj5History. Save it. (If the outlets don’t show, it could mean the file’s owner’s class was not set to its appropriate view controller, or you didn’t build the project yet).
22. Now open FirstView.xib. Control-click drag from the file’s owner to the image view and select aj3ImageView. Also control-click drag from file’s owner to the text view and select aj3History. Save it.
23. Now download the zip file of the 2 image and 2 text files that we need. Since I like sneakers, I chose air jordan pics and description. You can choose some other stuff you like, no biggie. Also download the 2 tab images I got from glypfish.com.
24. Now add these files to the resources folder in XCode. Just drag them over. Make sure to check “Copy items into destination group’s folder”, or things will go bad.
25. Now change FirstViewController.m. In the viewDidLoad, add these:
This just sets the aj3ImageView to the image file we want to show up. Then we get the path to the text file that contains the description, then we get the string it contains and we set the aj3History text view outlet to that string.
26.Similarly we edit our SecondViewController.m
27. Now let’s build and run!
28. Ok it works! But the tabs still does not have the images, it just has the title.
29. Easiest thing ever, open MainWindow.xib, click the first tab wait a sec then click it again, this selects the tab bar item. Go to the attributes inspector (command 1), make sure it reads “Tab Bar Items Attributes”. In Image drop down text, select “21-skull.png”. Also change the title to “AJ 3”.
30. Then do the same thing for the next tab bar item. Set its image to “34-coffee.png”, and title to “AJ 5”. Now we’re good to go! Build and run!


No comments:
Post a Comment